
How To Take Apart Xbox One Controller? Whether you're trying to fix a drifting joystick, replace worn-out buttons, or just curious about what’s inside, knowing how to take apart an Xbox One controller can save you time and money. While disassembly can seem daunting at first, with the right tools and careful hands, anyone can do it.
In this detailed guide, we’ll walk you through every step of taking apart your Xbox One controller safely and effectively.
Read Also: Live PlayStation Portal Stock Tracker Dont Miss the Next Drop
Important Warning Before You Begin

Taking apart your Xbox One controller will void your warranty. If your controller is still under warranty, consider contacting Microsoft support before attempting any DIY repair. Proceed at your own risk and always work in a clean, static-free environment.
Tools You Will Need
To properly disassemble an Xbox One controller, you’ll need a few basic tools:
T8 Security Torx Screwdriver (with a hole in the tip to fit the security screw)
Plastic Pry Tool or Guitar Pick
Tweezers (optional, but useful)
Small Flathead Screwdriver (optional)
Organizing Tray or Magnetic Mat (to keep track of screws and parts)
Know Your Controller Version
Before you begin, check which version of the Xbox One controller you own. Microsoft has released multiple variations over the years:
Original Xbox One Controller (Model 1537)
Xbox One S Controller (Model 1708)
Xbox Elite and Elite Series 2 Controllers
This guide covers most standard Xbox One controllers (Models 1537 and 1708). Elite versions have extra parts and steps, so proceed with caution.
Step-by-Step: How to Take Apart an Xbox One Controller
Step 1: Remove the Battery Cover and Batteries
Flip your controller over and remove the battery cover. Take out any AA batteries or battery packs. This exposes a hidden screw beneath the sticker or label.
Step 2: Remove the Side Grips
This step requires patience. Use a plastic pry tool to gently separate the side grips from the controller body. Start near the bottom and slowly work your way up.
Don’t use metal tools as they can damage the plastic.
Apply gentle pressure and listen for small clicks as the clips disengage.
There are two grips—one on each side. Removing them reveals four screws (two on each side).
Step 3: Remove the Hidden Center Screw
In the battery compartment, look for a circular sticker. Use a screwdriver or tweezers to poke through the center of the label. Beneath it lies the fifth and final screw securing the controller shell. How To Take Apart Xbox One Controller?
If you're uncomfortable damaging the sticker, try to peel it gently. However, this usually voids any warranty anyway.
You May Also Like: Mando de Xbox Starfield Peru: A Game Changer for Starfield Players
Step 4: Remove the Five Torx Screws
Using the T8 Security Torx screwdriver, remove all five screws:
Two on the left grip
Two on the right grip
One inside the battery compartment
Be careful not to strip the screw heads. Keep the screws organized as you’ll need them later for reassembly.
Step 5: Carefully Separate the Controller Shell
Once the screws are removed, gently pull the front and back shells apart.
Hold the controller firmly and pull from the bottom end.
Be careful: The rumble motors and trigger buttons are still connected.
Slowly remove the back panel while supporting the inner circuit board and motor assembly.
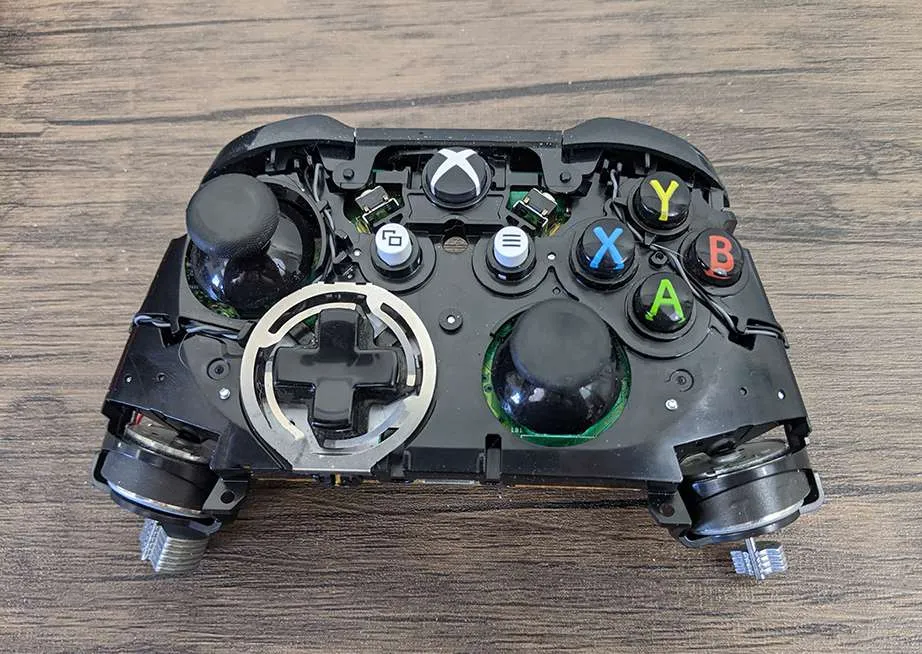
What You'll See Inside?
Once opened, you'll see several components:
Main Circuit Board
Trigger Mechanisms (LT/RT)
Bumpers (LB/RB)
Thumbsticks
Face Buttons (A/B/X/Y)
D-Pad
Battery Terminals
Rumble Motors
Take a picture before proceeding further. This will help you during reassembly.
Optional: Removing Individual Parts
Depending on your goal (cleaning, repairing, replacing), you may need to remove individual components.
Removing Thumbsticks
The thumbsticks are simply placed over their respective joystick modules. Gently pull them upward to remove.
Removing Buttons (A/B/X/Y, D-Pad)
To remove the buttons:
Gently lift the circuit board (watch the triggers and motors).
Once the board is off, you can pop out the buttons from the front shell.
Clean each button using rubbing alcohol or replace them with custom ones.
Removing the Trigger Assemblies
Be extra cautious when dealing with triggers.
Gently lift the trigger mechanism.
Note how the springs are mounted before removal.
Springs can fly off, so use tweezers or needle-nose pliers carefully.
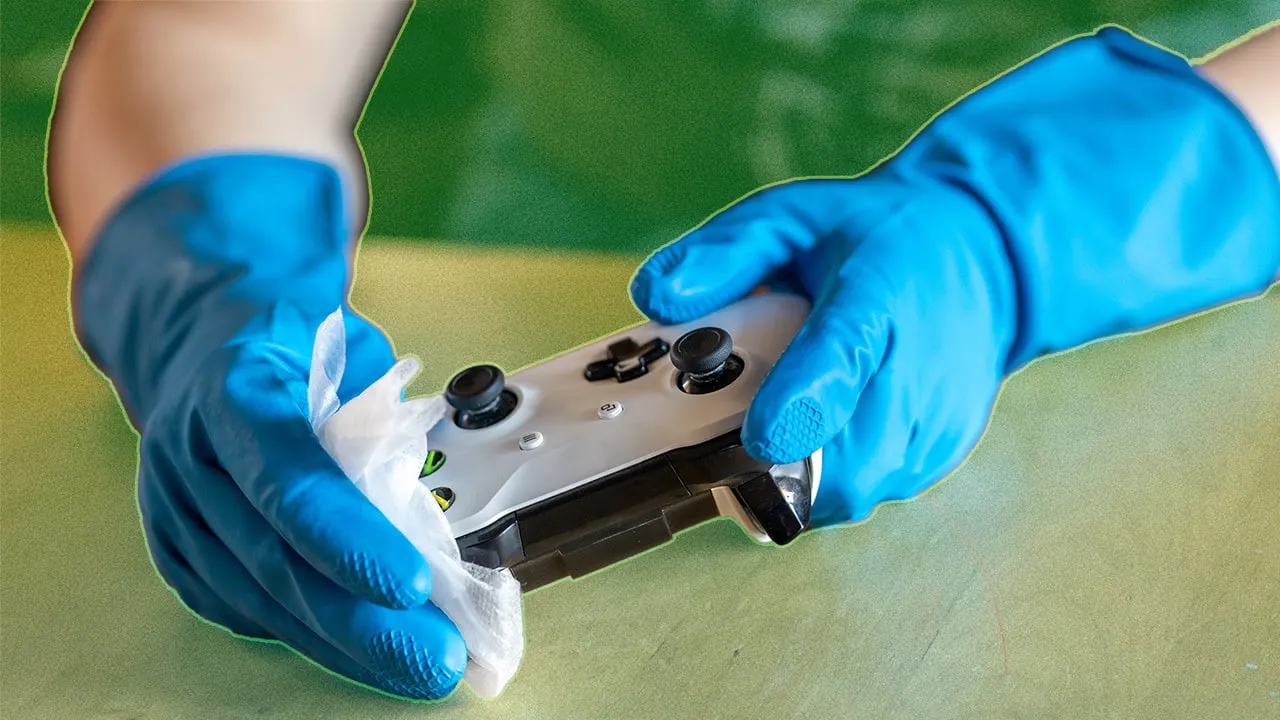
Cleaning the Controller
Now that it’s apart, this is a good time to clean your Xbox One controller:
Use a soft, lint-free cloth and isopropyl alcohol (90% or higher).
Remove dust, grime, and stickiness from the buttons and shell.
Clean joystick modules if you’re trying to fix drift (or consider full replacement).
Reassembly Process
After repairs or cleaning, you’ll need to put everything back together.
Step 1: Place Buttons and Thumbsticks
Insert all buttons (A/B/X/Y, D-pad) into their respective slots in the front shell.
Place the thumbsticks back onto the joystick modules.
Step 2: Reattach the Circuit Board
Gently lower the circuit board into place. Make sure the trigger buttons and motor wires are aligned and not pinched.
Step 3: Close the Controller Shell
Place the back shell onto the controller. Hold both halves firmly and squeeze together until all clips snap into place.
Step 4: Insert and Tighten the Screws
Using your T8 screwdriver, insert and tighten the five screws. Don’t overtighten, or you might damage the plastic.
Step 5: Snap the Side Grips Back On
Align the grips and press them into place until they click on both sides.
Step 6: Insert Batteries and Test
Insert your AA batteries or rechargeable pack, turn on the controller, and test every button, joystick, and trigger.
Pro Tips
Always work in a well-lit area on a clean surface.
Avoid touching the circuit board with bare fingers.
Take your time, especially when removing delicate components.
If something doesn’t fit during reassembly, do not force it—recheck the alignment.
Read Also: Pc Detecting One Controller Trigger As Both Triggers Xbox Series
Common Reasons to Take Apart an Xbox One Controller
- Fixing joystick drift
- Replacing worn-out buttons
- Cleaning sticky or unresponsive triggers
- Installing custom shells or buttons
- Repairing a broken USB charging port
- Cleaning out dust and debris from years of use
Where to Find Replacement Parts?
- Need replacement parts for your controller? Here are a few places to check:
- Amazon (joystick modules, shells, buttons)
- eBay (used or OEM parts)
- iFixit (repair kits and tools)
- AliExpress (affordable bulk parts)
- Make sure the parts are compatible with your controller model.
Conclusion
Taking apart an Xbox One controller may sound intimidating, but with the right tools and this step-by-step guide, it’s a manageable task. Whether you’re doing a deep clean, repairing joystick drift, or customizing the look, learning how your controller works is both practical and rewarding.
Just remember: patience, precision, and preparation are key. Happy repairing!
FAQs
Q1. Can I use a regular Torx screwdriver to open my Xbox One controller?
No, Xbox One controllers use T8 Security Torx screws, which have a pin in the center. Regular Torx tools won’t work.
Q2. What causes joystick drift in Xbox One controllers?
Joystick drift is usually caused by dust, wear and tear, or faulty potentiometers in the joystick module.
Q3. Is it safe to clean my controller with alcohol?
Yes, use isopropyl alcohol (90% or higher) for cleaning circuit boards and buttons. Never soak the parts—use a cloth or cotton swab.
Q4. How long does it take to disassemble and reassemble a controller?
For beginners, it takes about 30–45 minutes. With experience, it can be done in 15–20 minutes. Know about the how to take apart xbox one controller?
Q5. What should I do if a button still doesn’t work after cleaning?
The internal contact pad might be worn out. You may need to replace the button or circuit board for full functionality.